21 December 2013

I don't think I'll ever be a quilter, but...


I wont say I hugely enjoyed the process of making this quilt. I cant imagine making them on a regular basis. 
I managed so sew some of the blocks the wrong way round, which threw the balance out a little. And it probably could have done with some plain fabric to tone it down a little. And the two afternoons I spent hand sewing the binding with a sore finger because I apparently somehow don't own a thimble of any description? Don't ask.

Backyard Baby quilt, Patty Sloniger

But I'm pretty happy with how it turned out, especially for a first try. 

I have no idea what the pattern would be called. I just knew that I didn't want plain squares but I also didn't want anything too complicated so I fudged my own pattern after some googling.  The quilt is roughly 90 x 120 cm which will be perfect for a play mat and sofa snuggling. 

I had a pretty hard time attempting to baste it. I used warm and natural batting inside, which handled pretty well and was eventually easy to quilt. But the basting felt like it took forever and despite using tape and the spray and some pins I never quite got it to sit right. Its worse on the back than the front though, so its not the end of the world. 

Backyard Baby quilt, Patty Sloniger

The actual quilting wasn't too bad. Free motion quilting was asking a bit too much, so I stuck to outlining each shape, and adding an extra square inside the larger shapes too make sure the batting was sufficiently held down.


I followed one of the myriad of internet tutorials for the binding and ended up with some OK mitred corners and a join that is solid yet not obvious. As much as I didn't much enjoy the hand sewing (seriously, how do I not yet own a thimble?!) I do like the clean look. I would never have managed to keep my machine stitching neat enough to be happy with it.


Now we just need the baby to go with it! 
Hopefully he knows its in his best interests not to be born over Christmas
(but doesn't hang around too long after!)

27 October 2013

Stash busting Maternity MuuMuu :)

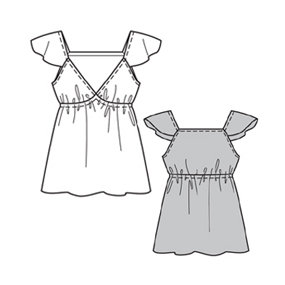
I've had the Burda "Tara" pattern sitting in my online stash for a while, since it was a friday freebie about 18 months ago in fact. I liked the style and different construction to the norm but I'd never quite got around to making it.
I found this lime green and brown cotton voile in the Spotlight clearance wrack some time last summer. I'd seen a women in a dress with a similar "butterflies made out of butterflies" fabric... but hers was a bit more of a muted colourway. I was going to make it into a shift dress to show off the pattern, something Laurel-esque. But I never did. And I probably wouldn't have worn it anyway! Its very green.

With the weather heating up here (I'm typing this outside on a glorious 28 degree cloudless day, yey for spring!) I decided to bite the bullet and make a simple throw on dress for days when clingy jersey just seems tooo nasty.

Actually, it started out as a top with 3 inches added to the length to stretch over the ever expanding bump. I cut the 44, since I figured I needed all the room I could muster and the empire line is brought in with elastic anyway. I contemplated trying to cut a smaller back and shoulder piece but that was too much thinking so I decided to just fudge it into fitting later...

Tara has a different construction to anything I've sewn before- raglan style flutter sleeves that connect the (very deep) front panels to the back pannel. That made it quite easy to fudge the fit by simply pinching out the extra material at the back seam. You finish the edges prior to sewing, so it literally is just a case of pinching then making sure the edges match. I  took about 4cm off on each side... Its meant that the back sits a little higher than it might otherwise but meh. Good sun protection ;)


Once I'd got it so it didn't fall of my shoulders I finished the edges and realised I still probably wouldn't wear it. Because if its too hot for jersey, who can really be bothered with shorts.
So I used the remainder of my fabric (true stash busting win there!) to add a flounce around the bottom hem.

I'm not sure I'll wear this version out of the house- its got a fair few flaws and its lime green and from the front and side I look like a tank- but its cool and flouncy and presentable enough to answer the door if needed. Though they might get an eyeful from that low-low-low front... Its got plenty of growing room left for the next couple of months, and theres plenty of breast feeding access and post-baby tummy hiding potential for the rest of the summer!

And just in case you think I'm neglecting the little one: How cute are these pants?!


The pattern is from Purl Soho here, available free in sizes up to 9 months. 

10 October 2013

Maternity Sewing - 6 months in.

Most of my recent sewing has been for the baby, from cutesy nappy covers to nursery decor like curtains (boring! but satisfying) and an underskirt for the cot. Baby stuffs will continue to be added to my flickr set, over on the side bar. Go check it out!
Some of it has been for me though, with mixed outcomes!

My favourite and generally most successful makes are the gathered T-shirts using the tutorial Zoe put out a while back. When I'm wearing them I feel pregnant, not just fat! Definitely a win. I've made 4 of them now, with my favourites being the dino vest (spotlight clearance, 18 months ago!), and this one I just made in preparation for Mo-vember. Its cut from some thin ?slub jersey I got from the charity shop a while back for $1. Win.


The dino vest was an early attempt at sewing knits, so while I love it there are lots of faults. The Mo is much more "professionally" finished, with neck and arm bands and an extra wide hem band to finish it nicely and add a bit of extra length that it badly needed! The pleats in the mo top feel a little high, but it still works. If I make another I'll probably drop them a few centimeters.
Once it was done I used the below image to free-hand a moustache onto the bump. I traced an outline in chalk, then used a paint-tip sharpie to draw the hairs. I just need to hot press it to hopefully make it stay around for a few washes. It looks good and bushy- not sure I could pull that off again!


A semi-success is this boyfriend cut t-shirt made by tracing a RTW maternity top.
Maybe I'll become more of a fan of this style once the weather heats up and its nice and comfy, but the silhouette just makes be feel like I look fat not pregnant...


And on the subject of feeling huge, my least successful makes are the Washi Dresses I made early on. The silhouette just makes me feel the size of a bus now I have a bump to fill it out! I have one in a very light voile that will be good for hotter days without feeling too huge as it drapes ok, but the one I made from cotton sateen for "special occasions" looks like a tank!
I did learn how to make a functioning button placket... I just need to do a FBA to stop all that pulling! So I'm thinking I might make a couple of these in floaty fabric for all the hot months after baby is here to cover the post-baby bump and allow easy access for breast feeding.


Currently on my sewing table are my first hesitant steps into the world of quilting (nearly finished the top, but I think thats the easy bit!) and some burnt orange ridiculously stretchy fabric which I intend to attempt to use to copy a RTW dress I love. If I survive all that stretch. 

14 September 2013

Surfing Space Robot Cargo Pants

My mother in law know I like nothing better than new toys to play with. Last year for Christmas she sent me a box of notions which was awesome. Just basics, like every colour of thread in the rainbow and new pins, but its so nice to have these things on hand.

To celebrate the halfway mark in this pregnancy she sent me two books of kids sewing-
Cute Clothes for Kids by Rob Merritt
and
Sew Baby by Choly Knight

I'll eventually do a bit of a review of each of those, but for now I have the first project from CCFK. Its just a pair of pants, admittedly, but the styling in the book shows so many detailing ideas that take it a little beyond the usual. I traced one of the pocket shapes. Its just a patch pocket, but the extra flap (purely decorative) on the front just adds a little extra. And since I'm banned from ruffles (boo-hiss) I used bias tape to add the stripe and the tab under the pocket.

Baby cargo pants from Cute Clothes for Kids


The waist is easily adjustable, using buttonhole elastic, and the hems are loosely tacked up, as until babys is here I have no faith in my sizing! I debated the button hole, well- mainly the button, but I figure I'll have the pants on a setting that just keeps them on, so the button wont be pressing in too much. Its not like baby will be doing much! In pants that take less time I've just been leaving a gap so I can get in and adjust the elastic if necessary, but I'm not sure if this will fall into the too-hard basket and they just wont get used... which would be a shame because we all know how much I love this fabric!

To put the buttonhole elastic in I simply sew 2 buttonholes slightly larger than the elastic, one on each side of the centre back, in the main portion of the facing. I then sew the casing closed all the way around, sew a flat button at centre back then feed the elastic through. 
Adjustable buttonhole elastic waist band in big butt baby pants

So hopefully I'll get some wear out of my efforts. 
Target have a sale on at the moment, so I've been stocking up on plain singlets to go with all the funky patterned bottoms I seem to be making!


26 August 2013

All Black Geranium

A friend of ours is due to have a baby daughter at the start of next month, and knowing how keen he is on his rugby there was an obvious choice for a present for the new arrival. To welcome her to the team. I'm sure her Mum will hate me for it, but the thought is there!

So, I started by cutting a stencil out. Trust me. Don't do it! Such a fiddly motif! Then as I was applying the second coat of fabric pain The Boy got a message... "Shes on her way!". Perfect timing or what! Luckily the Geranium dress is a quick sew. Especially the 10th time :) Sadly I had to photograph it really rapidly for my records, as I was hemming it before baby yoga on Saturday morning and the new father was potentially coming round when I was out, so these are on the sofa in the dawn light!


See why her mum might hate me?
Hopefully the (black) flutter sleeves and the white underskirt take the edge off!
For all the fiddling, the Fern turned out quite well. Its not the smoothest, clearly stencilled not screen printed, but the overall look is exactly what I was hoping for.

The dress is fully lined, which gave me a headache attempting to figure out how to make the opening in the back work. In the end I sewed the outer and inner dress together, leaving the opening clear, then sewed the outer and inner together around the opening, leaving the top 1.5cm on each side open so it can be attached to the bodice. Once turned the right way round and clipped and ironed it seemed to work. 

It was all sewn up as rapidly as I could justify, as we were due to see the father the next day (all going well with the birth) so it needed to be ready to go! And there was me patting myself on the back for starting it early. Thats babies for you!

13 August 2013

A new toy and a new challenge

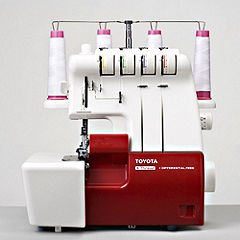
I've been telling the Boy for a while that I wanted to get an overlocker/serger to add to my collection. It was on the list of baby necessities ;) Seam finishing can be awkward enough, never mind on teeny tiny baby clothes that will (hopefully) be put through their paces in terms of washing and wearing. And I hate sewing stretchy fabric on my machine. It just never seems to work for me!


So when I saw this Toyota overlocker (SLR4D) on sale for half price at Spotlight last week, I knew it would be mine. Toyota arent exactly the brand that come to mind when you think of sewing machine creators, but I've had my sexy black Toyota sewing machine for a couple of years now, and its a dream to sew with, so off we went!

It took a few plays to get the hang of it, and its still a bit (hugely) scary that it has the potential to cut a big hole in what ever I'm working on, but I'm in love. I've used it to finish off seams on a few prototype baby garments, and sew another little onsie, but my first big adventure was with my first attempt at a maternity top. Sewing to fit a rapidly expanding stomach... Whole new challenge.

I roughly followed the tutorial by Zoe on how to transform a t-shirt pattern into a maternity top, using the Burda Sadie as my base (I some how stashed this one away for free a few years ago, but had never actually tried it).

Here is what the pattern looked like after I'd hacked it up, adding extra length between the "extend here" lines and the waist:


Can you guess which one is the front?! And then I made it up, folding the excess fabric into 4 pleats on each side.
Then I decided it was time to have a play with what else the overlocker could do, so I switched to 3 needle mode and finished off the bottom hem in as a lettuce hem, or what ever its actually called. Stretched out and encased. Then I did the arms and neck to match, since it was just a muslin and since I've still not really mastered the technique for adding neck bands. The arms stretched out more than expected in the process, so I took about an inch off under each arm to fit them again, and we were done. 
The whole thing took maybe 2 hours, from printing out the pattern to putting it on.


Its still got quite a lots of growing room in it, which is lucky since my baby bump is still very small!
I'm calling it a win and sorting through the relatively large stash of stretch fabric that I've picked up on sale or from the OpShop over the last few years and getting some variations planned out so I'll be prepared once it finally stops raining and starts to warm up!


06 August 2013

A little sewing dare

So, this dare was set unknowingly for me by The Boy.
I saw this fantabulous surfing space robots poplin in Spotlight, but the Boy said it was too Boy for our neutral baby, so I decided to girlyfy it. Regardless of what the baby turns out to be I'm sure it'll find a home somewhere.

So Voila!
A teensy tiny 0-3 month Geranium dress in the top length, and some of SeeKateSews Baby Bloomers to go under. I'm sure that this will get worn at most once, if ever, but I really enjoyed the process of making it. 
To add to the included ruffles of the bloomers I added an extra orange bias tape ruffle across the bum.
I didn't close up the elastic holes and cut on the extreme side, so they can be let out or taken in as needed once I have someone to try them on!


I think these might be boyish enough to work regardless of gender, though I'm sure The Boy will disagree! I will admit that the other pair I made are a little too far on the girly side due to the massive rufflebum:


This will be a summer baby, so will probably live in singlet and nappy covers or onsies for the first few months of its life, so thats where My sewing focus will lie.
But sometime you just have to give into the dare!

02 August 2013

I finally sewed something!


Using this tutorial from SpaceFem. I reused an old t-shirt, making the most of the already finished neckline and the hem for the sleeves, which left me to simply bind the bottom opening. It went together like a dream, despite my bit of hacking to be able to use existing features.

I've made some baby clothes before, but never onsies.
Who is this one for, you ask?
Well... 
Me!
Hence the lack of sewing for the last few months. I didn't want to jinx my self by sewing maternity or baby stuff, just in case, and I didn't want to sew clothes that may never fit again depending how much damage this baby causes to my body shape on a long term basis!

What have I doing instead? Mainly sleeping.
But a couple of weeks ago we finally went on a road trip I've been wanting to do for a long time, all the way down to Esperance- 2000km all up. But you can see why it was worth it, even if it was a bit chilly.

And we finally stopped in a Wave Rock... the most underwhelming tourist destination in all of WA.
Cue surfing the rock photo.


25 April 2013

ANZAC Day - Remembering our lost soldiers

Australian soldiers, ANZAC spirit. world war two, Italy, escaped prisoners of war, reflections, Alpe Barbero, Trivero, 5th May 1944

Today is ANZAC day here in Australia. I was up and out of the house by 4:15am to get to the Dawn service I was playing at, then drove back into the city to play in the main parade. Big day! I think I sent about 5 hours holding 6kg of brass up in front of me! My arms hurt!

What was a thinking of during the silence, I hear you ask? My mind went back to when I was in Italy, and stumbled on a memorial for 5 Australian and 1 English soldiers in a remote valley in the mountains. They were escaped prisoners of war, killed here while waiting for the weather to improve enough for them to cross the mountains into the safety of Switzerland.

Maybe it was the unexpected nature of my discover, but finding this little memorial nestled into those steep hills really struck something in me. I couldn't help thinking I was one of the only visitors that this place has received. I couldn't find any information on it when I searched, and there were no signs of life other than that very weathered-looking bunch of flowers. I spent a while there, reflecting on their story and thinking how much strength they must have had to survive all they did.
They weren't heroes. 
They weren't superhuman. 
They were (probably) young men who had been shipped off voluntarily to the far side of the world, fought and been captured, survived as a POW until they could escape then survived in the mountains, a place where I had so many precautions in place to make sure I was safe and yet still felt uneasy. And then they were ambushed and shot.
To get as far as they did must have taken so much inner strength. I hope that I can find those same reserves in myself if I should ever have to, but hopefully because of their sacrifice I never will have to face what they did.

One of the four key responsibilities we agreed to when we became Australian was to defend Australia should the need arise. Having to agree to that rather than having it sitting in the background is a very confronting thing to do. I left a river stone on the memorial, with "Lest We Forget" and some flowers marked on in paint marker. I don't think it will last the weather conditions, but I'm happy that I marked their sacrifice as well as I could.

Since I couldn't find any information, here is my bad translation of the sign near the memorial. The location is shown below, but there are no roads recognised by google, so to get there you get to Castagnea village, and turn right at the T junction at the top of the town (western side) and follow the dirt road down into the valley, past the Santuario della Novareia to the river and the hydroelectric powerstation (Piancone). Then follow the river south until you notice the little sign. Its a one track dirt road and you will need a car with good clearance.

Around September 8, 1943, the Allied soldiers who were in the fields of Vercelli plain as prisoners of war gained their freedom and tried to get to safety in Switzerland.The flow to the Swiss territory was assisted from the first anti-fascist organizations that had set up a system of accompaniment through which many of the former prisoners were guided from the plains to the mountains of Biella and Valsesian and Ossola and then to Switzerland, usually through the Passo di Moro Macugnaga. Not everyone, however, managed to reach Switzerland, as the Germans occupied militarily the crossing points and also because, with the passing of time they became weather conditions deteriorated.Among the prisoners who remained in Italy, some were again captured, others joined the Resistance, and many took refuge in the hills or in the mountains, surviving thanks to the generosity of the local population or to aid liberazion National Committees.In the spring of 1944, several hundred former Allied prisoners were still in the Biella area waiting to ripen the conditions for the move in Switzerland. These include a group of soldiers had settled here at the Tagliamento Legion [part of the fascist National Republican Guard], department commanded by Marico Zuccari, who made ​​numerous and frequent roundup actions against the Resistance and looking for draft dodgers, both in Valsessera in Sesia Valley.
The presence of a group of soldiers [the escaped POWs], who were not part of the Resistance, was reported to the command of Tagliamento Legion by an informant.On May 5, the former prisoners were surprised by the fascists as they were returning from Mosso, where they had gone in search of food and information, and shot. In the event five soldiers were killed Australians, and one Briton.The pastor of the Alpe Barbero, Lorenzo Verzoletto, escaped through luck, but was forced to dig the graves of the soldiers along with Agusto Massaro.The names of the fallen are shown in the plaque erected in memory of the massacre.
C Ladell (AIF)
H Blain (AIF)
E Woolf (AIF)
T Nichols (AIF)
S Harvey (AIF) 
I English

View Untitled in a larger map

19 April 2013

And now it is.

Enough, anyway. I think I need to bite the bullet and buy a french curve, as the problems with the skirt resut with me not being able to draw a smooth curve! Can you tell I'd been wearing it sat down for a few hours?


And I finished the last pair of pants for MMM
(Can you guess the Boys name?!)


14 April 2013

So I thought this was finished...

...then I took the photos, and the camera never lies!

chevron skirt, colette meringue skirt, yellow and grey, sewing, perth

It looked fine in the mirror, though maybe in need of a bit of an iron.

But from the back?

chevron skirt, colette meringue skirt, yellow and grey, sewing, perth

Whats with the weird puffy sides?!

So its back to the machine for this skirt, to try and smooth out those puffs!
I have a horrible feeling I may have to take the invisible zip out and start it again, but I'm hoping it doesn't come to that!

In other news, I just got back from the local sewing meet with 3 new pairs of knickers, all ready for MMM. I have one more pair cut out and ready to sew. While 5 pairs might be a bit sparse for the whole of May, its been a fun learning curve. I can definitely see the improvement in technique.


10 April 2013

Me Made May Pledge


  I, Ellen, sign up as a participant of Me-Made-May '13

I endeavour to wear 1 handmade item, teamed with one handmade accessory each day for the duration of May 2013.

I also aim to have made enough pants to last me through too!*

me-made-may'13

*A short laundry turnaround might be necessary!


Last year was my first real attempt at this, and I did pretty well despite being on fieldwork for some of it.
This year has no such hurdles, so all should be well. And Its one of my 2013 sewing goals, so I have to do it, right?!

My hand made wardrobe isn't massive, but its bigger and more varied than last year and now contains more separates and more "grown up" clothes. I never did get around to making that capsule wardrobe, but I think I did work on having items that go with things I already own. Its been a lot easier slipping me-mades in un noticed. Or at least not sticking out like a sore thumb.

Before May I plan to make a Laurel fall dress, out of some thin grey wool blend, and another skirt in a fabric that I have been coveting for a while. There should also be a Mathilde blouse after I won Adriennes "New Beginnings"  giveaway. The patterns all ready to go, I just haven't had the guts to start yet!

I bought some fancy fold-over knicker elastic at the recent local half price sale, so that should help me make a few more pairs of pants.The pants don't count as and item or an accessory, they're just an optional extra that I've been meaning to get around to producing for a while!

I got a lot out of last years MMM, despite and possibly because I didn't have many things to wear! So if you're contemplating it, I'd say do it! You choose your own challenge, so its as easy or as hard as you make it. 
I'll be posting daily photos in the flicker group, then probably just summarising on here. Otherwise it can get a bit boring.

If you're participating too, leave a link and we can compare notes :D

08 April 2013

1st Birthday Geranium Dress

Remember this little baby girl? Well, she just turned one!


We went to her birthday party on the weekend and one of her presents was a new dress. I think Made-By-Raes Geranium dress is a great base to work from, so I bought it for future reference!

I found this pretty poplin at Spotlight, in colours that I thought would suit. I went with the cap sleeves, neck notch and pleated skirt, then added piping to the bodice and also to a band around the bottom of the skirt.

Geranium dress- front

Geranium dress- back

The back is closed by hammered in snaps. They give a very professional finish, though they are a bit scary at first! As you can see, I hammered them in wrong the first time, too far from the edge which would make the dress too small. They came out eventually, but left a bit of a mark. Nothing too obvious from afar though.

Geranium dress- snaps closure

The inside is all nicely finished, with the bodice hand sewn down hiding bodice seams, french seams on the skirt, and an "overlocked" finish to the band (trimmed and zigzagged).

Geranium dress- inside

The parents liked the dress, and bubba seemed drawn to the pattern, so I'm calling that a win!


07 April 2013

Australian Nationals 2013

Is it really a week since Nationals finished?!
I had an awesome long weekend, releasing lots of pent up band-geekiness!
Friday was our hymn and Test Piece- "Northern Landscapes" - which is a big work that all the bands in the section have to play. The euphoniums had the opening notes and we managed not to split them, so we knew it would be all good from there. 

Saturday morning was the march contest, through the streets of Northbridge. There was a decent crowd watching the rare spectacle. Western Australia only has about 7 bands, spread across its vastness, so nearly 30 of them marching down the street is definitely not what you expect when you go out for brunch!

And Halt! Marching through Northbridge
On the inspection field prior to marching off

Then Sunday was the final day of the big competition. A stage march and our own choice test piece - "Rhapsody in Brass". We pushed pretty hard in our test piece, probably a bit too hard. Its normally a test piece for the grades above our lowely C-grade status, but we felt we pulled it off pretty well. We had a great time playing and preparing, and felt that our final performances of each piece were just about the best we'd ever played. 

In the auditorium performing our test piece

We ended up coming 3rd, behind two bands that were on the very top of their game. 
The band in general was a little disappointed to hear the results read out, but after some time to reflect it was a great first attempt at the national competition (the state competition isn't much of a competition...) and a great base to build on. 

During the week we had a party instead of rehearsal. 
And I made cakes :)
In band colours. 

Bring on next year!

red velvet cupcakes

And the pep talk from our conductor:
"I could not be happier with the way the band played today! We went in each day and played exactly as we had rehearsed it. Everything went exactly to plan (well as much as one can expect on contest day). All the comments from the adjudicator were very complimentary- nothing on the tapes is worth hanging our heads low about! There were 2 bands there today who are at the very top of C Grade at both nationally and state level and even in one case really should be in B grade. Lets think back to before the adjudication when we all agreed that the band never sounded better in this whole lead up to contest! I have never been prouder of this band and you can bet ill be singing the praises of the band to the guys at work on Tuesday!! I am so proud of this band- and I hope you are too!! Well done!!